CARRY OPTIONS
The most common carry options
The most common holster carry positions vary according to different operational needs and include:
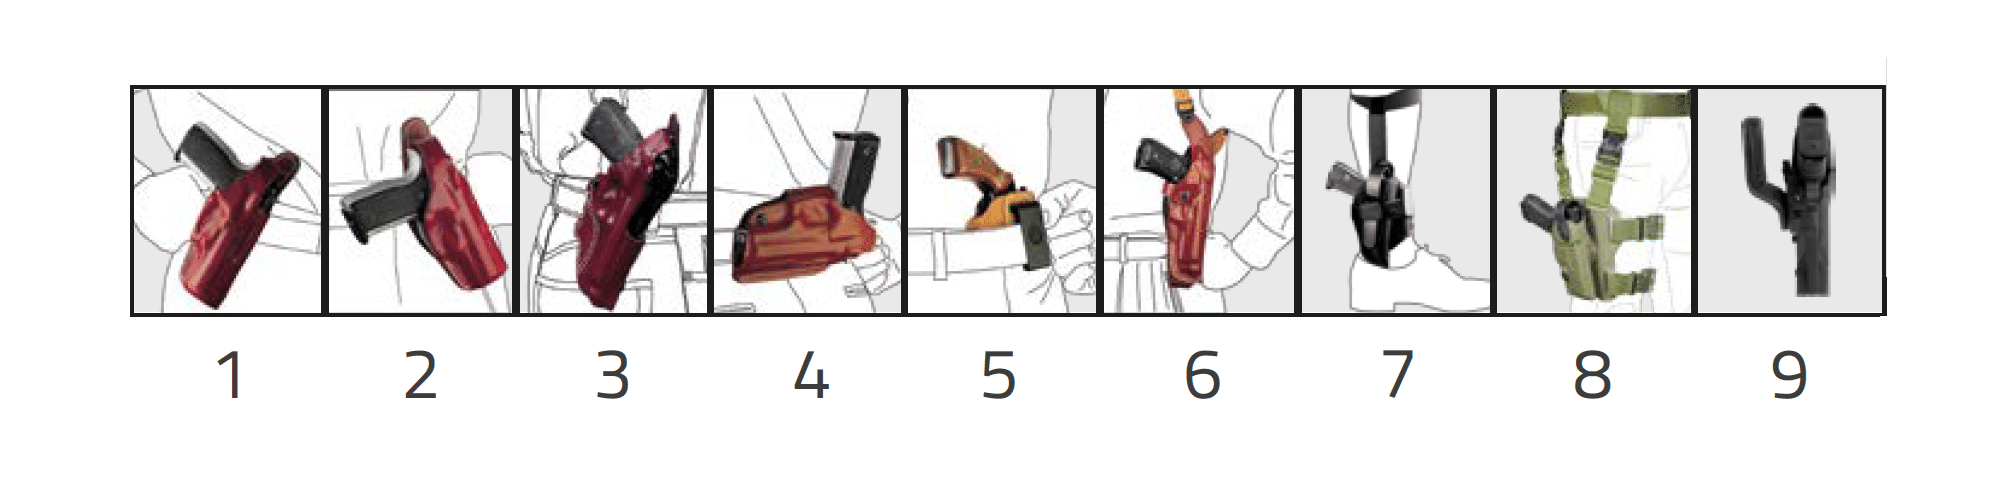
- On the right side (left side for left-handers); concealed carry or uniformed on the right side (left side for left-handers).
- On the left side for cross draw (right side for left-handers); concealed carry.
- Behind the back at an angle; concealed carry.
- Behind the back horizontally; concealed carry.
- Inside the waistband; concealed carry.
- Shoulder carry in horizontal/vertical/inverted positions; concealed or uniformed.
- Ankle carry; concealed.
- Thigh carry; uniformed or tactical suit.
- Off the body side carry; for use with bulletproof vests or tactical vests, uniformed or tactical suit.
Carry System Program
Over the years, the needs of security operators have become increasingly diverse and specific, particularly regarding the ways and positions to carry a handgun. To meet these needs, Vega Holster has developed a series of loops and platforms named V.C.S.P. “VEGA CARRY SYSTEMS PROGRAM“. The above diagram shows a relationship between the belt line and the position of the weapon in the holster. Each passing system found in the following pages prominently includes the IP (position identifier). The position identifier is divided into 5 values:
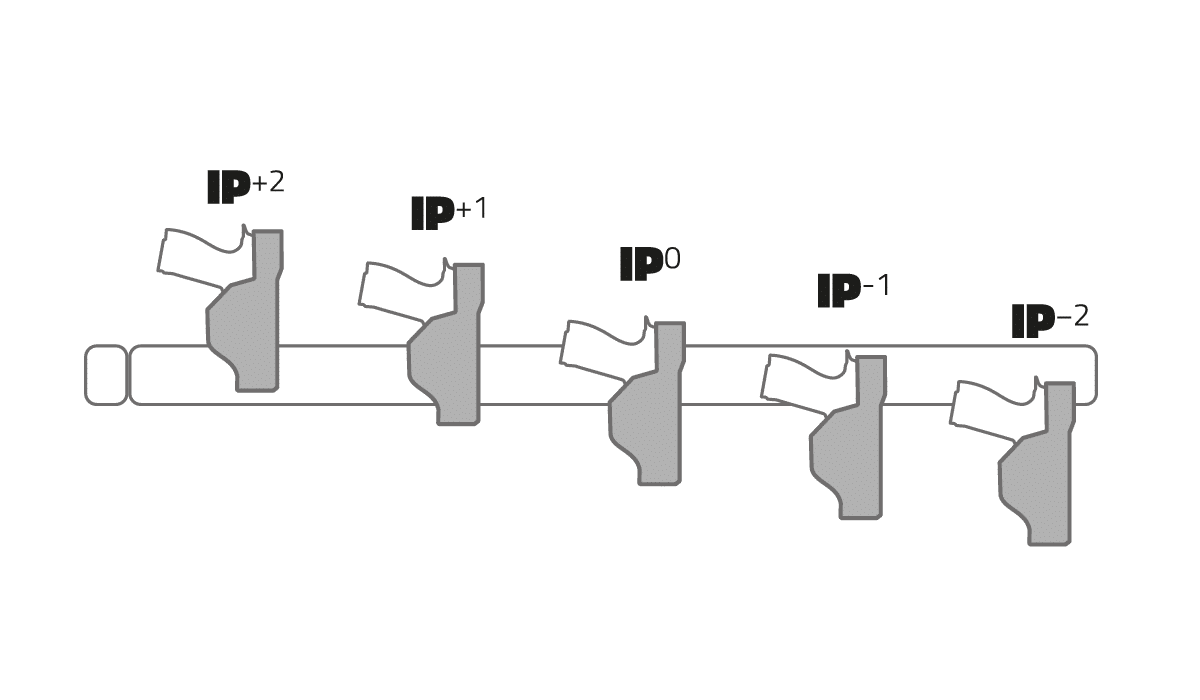
- P+2: This configuration positions the weapon’s grip significantly high relative to the belt, making it particularly suitable for concealed carry, ensuring maximum discretion.
- IP+1: With the weapon’s grip positioned slightly high relative to the belt, this option is ideal for use in vehicles. It prevents the weapon from pressing against the seat, thus avoiding possible dangerous situations or difficulty in drawing.
- IP0: The weapon’s grip aligns with the belt line. It’s the standard system for uniformed service, offering an optimal balance between ease of drawing and comfort.
- IP-1: This configuration lowers the weapon’s grip below the belt line, facilitating a quick draw. It’s an excellent choice for those who need quick and agile access to their weapon.
- IP-2: In this position, the weapon’s grip is located well below the belt line, offering a semi-thigh configuration. This allows for a very quick and natural draw, ideal for situations that require an immediate response.
All Vega Holster loops and platforms can be mounted on all Vega Holster holsters with the TRIPLE SCREW fastening system.
Some loop systems allow for the adjustment of the holster’s tilt and height via screws; in this case, the above value could change.
Other loop systems allow for the adjustment of tilt via a lever (without having to act on the three fastening screws); in this case, the above value does not change, but the characteristics do (as being able to rotate the weapon by 90°, a holster with an IP0 or IP-1 value will have the possibility to take up less space when used in a vehicle).
Then there are loop systems that remain distant from the body for the use of tactical and/or bulletproof vests or to make drawing faster or to prevent accidental snagging of the weapon during drawing (the use of these is mainly intended for uniformed officers); finally, other loop systems remain close to the body and are preferred for their better concealability and for the sensation they give of always having the weapon under control and in contact with the body.
Naturally, the operator can decide to have multiple loop systems for their holster (if they do not want to have two specific holsters) and switch them according to daily operational needs; for example, an operator can perform both uniformed service and plainclothes duty, so they will need a holster that allows good concealability and one that allows use with a tactical vest and/or bulletproof vest. Choosing the right carry system according to one’s habits and operational needs is the first step to having the ideal holster.
Warnings
It is essential to exercise the utmost caution in handling, storing, and carrying firearms, as well as during the operations of drawing or inserting the pistol into the holster. Always ensure to insert the loaded pistol into the holster only after verifying that it fits perfectly. It is the user’s responsibility to ensure full compatibility between the weapon and the selected holster.
When inserting the weapon into the holster, especially if it is new and therefore stiffer, it is recommended to keep the finger on the lowered hammer of the weapon to increase safety.
In choosing the holster, it is crucial to carefully evaluate the material that best suits your needs, the most appropriate model for the type of carry, and that integrates well with your clothing. Verifying compatibility between the weapon and the holster is a fundamental step.
It is advisable to practice some draws before actual use of the product; this will help the holster to better adapt to the weapon and allow you to gain more confidence with the new accessory.
It is also important to periodically check the accessory parts of the weapon and ensure their correct functioning. Remember that any modification made to the holster can compromise its safety and effectiveness, therefore altering the original product is not recommended.